Why I Built My Own Mac Fan Control Tool
When the fans spin up, the menu bar tells you nothing. I couldn't find a tool that was free, open source and lived in the menu bar, so I built FanBar.
1. The trigger: loud fans, no answers
A while ago I was running an Xcode archive late at night when my MacBook’s fans suddenly took off, roaring in the quiet room. I glanced at the menu bar out of habit — nothing. What was the temperature? The fan speed? Was it a problem? I could only guess.
macOS has always been “elegant but aloof” here: it manages the fans itself but never tells you what it’s doing. To see what’s going on, or to step in manually, you need a third-party tool. There are a few, but none matched what I wanted (more on that below), so I wrote my own: FanBar.
2. Why not Macs Fan Control or iFan?
Short answer: I tried both, and both are good — they just don’t quite fit what I wanted.
Macs Fan Control is the veteran of the category. It supports Intel and Apple Silicon, monitors temperatures (even S.M.A.R.T. on third-party drives), and offers custom speeds and sensor-linked control. Feature-wise it’s hard to fault. The trade-offs: the full feature set requires Pro (about $15), and it’s closed source — for something that touches hardware directly, I’d rather the code be public and auditable.
iFan (by Better365) is the closest to what I wanted: native M-series and Intel support, one-click max speed, per-fan manual control, temperature-based policies, and regular updates. It’s also closed-source commercial software.
So my list was short: free, open source, and living in the menu bar. Nothing ticked all three, so I built it.
| FanBar | Macs Fan Control | iFan (Better365) | |
|---|---|---|---|
| Price | Free | Free basic, Pro about $15 | No listed price (direct .pkg download) |
| Open source | ✅ Yes | ❌ No | ❌ No (commercial) |
| Chips | Apple Silicon + Intel | Intel + Apple Silicon | Native Apple M-series + Intel |
| Fan control | 4 presets + custom temperature→speed curves | Custom RPM / sensor-linked + presets | One-click max / manual per-fan / custom temperature policy |
| Monitoring | CPU/GPU/SSD/battery + 10-minute chart | Real-time, S.M.A.R.T. for third-party drives | CPU/GPU/disk/battery/Wi-Fi in real time |
| Menu bar | ✅ | ✅ | Unclear (mainly a standalone app) |
| Safety fallback | Hands control back to the system on quit or crash | Restores Auto on quit | Not documented |
| Signing | Developer ID signed + notarized | ✅ | .pkg distribution (established vendor) |
| Languages | Chinese and English | Many | Mainly Chinese |
| Maintenance | Active | Active (commercial) | Active (currently 1.1.3) |
3. What FanBar looks like
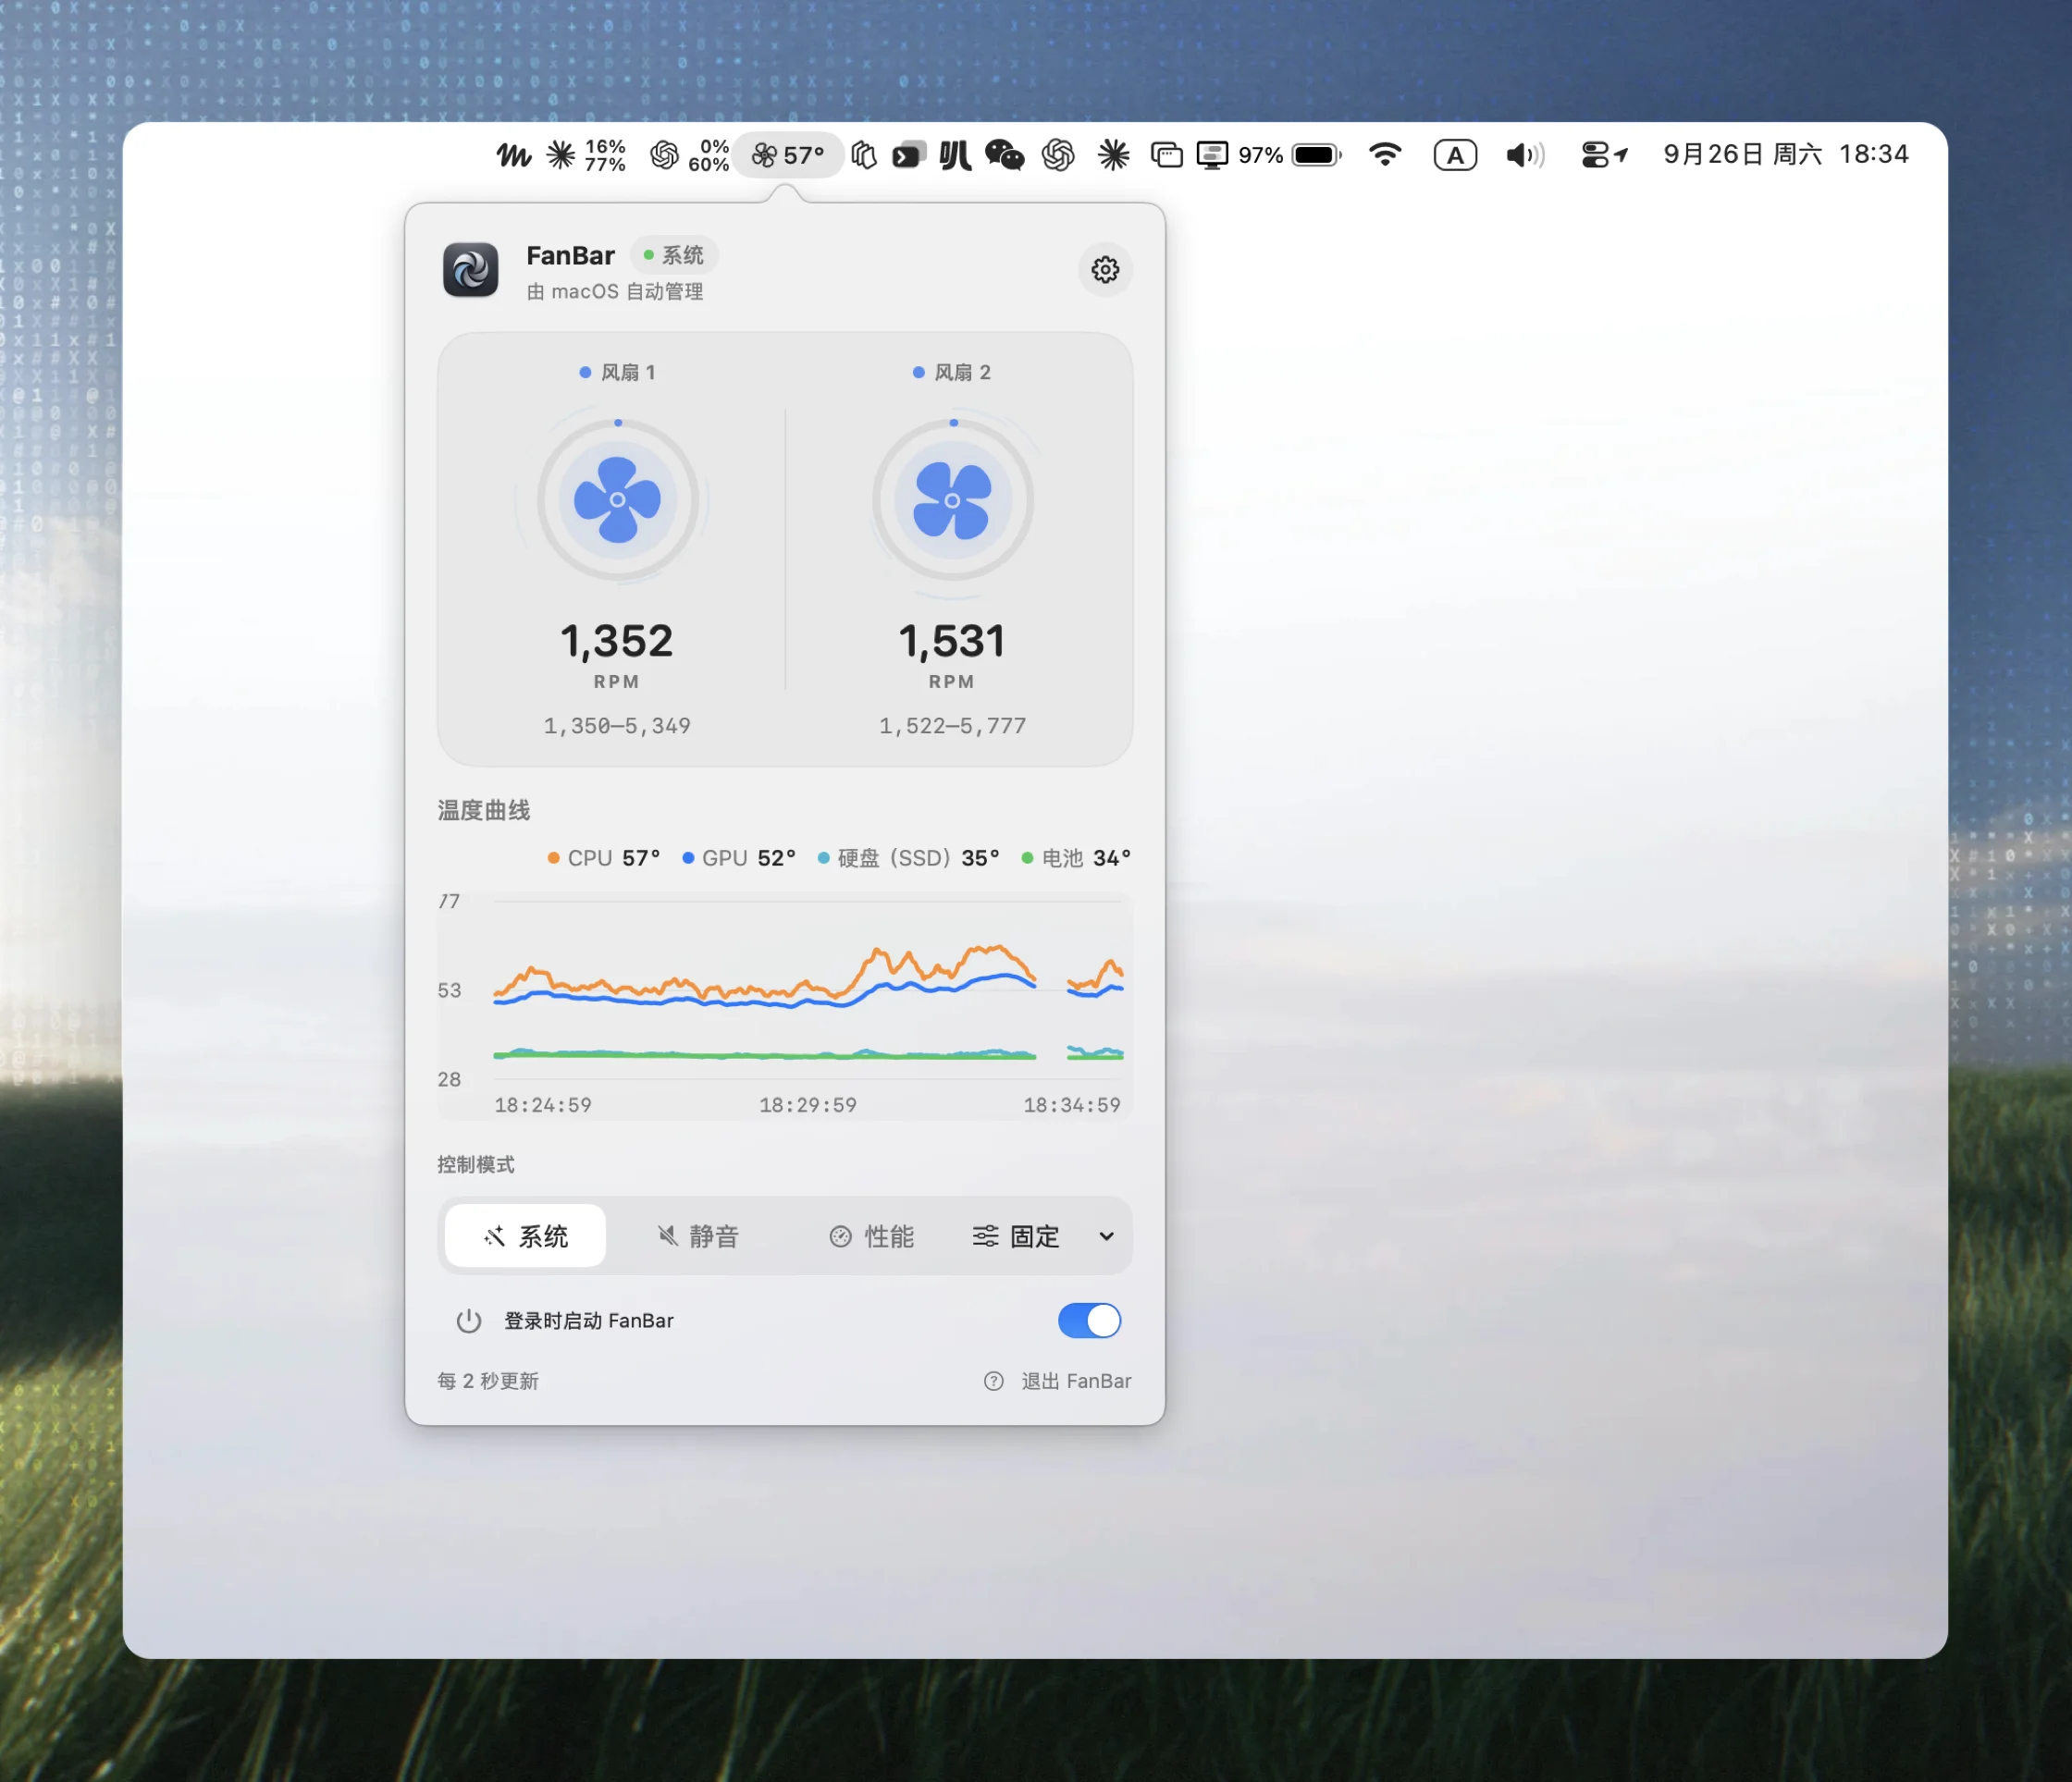
FanBar lives in the menu bar and shows two numbers: CPU temperature and fan speed. One glance tells you where things stand. Click it for a small panel with live CPU, GPU, SSD and battery temperatures, plus a rolling ten-minute chart, so you can see exactly what made the fans spin up.
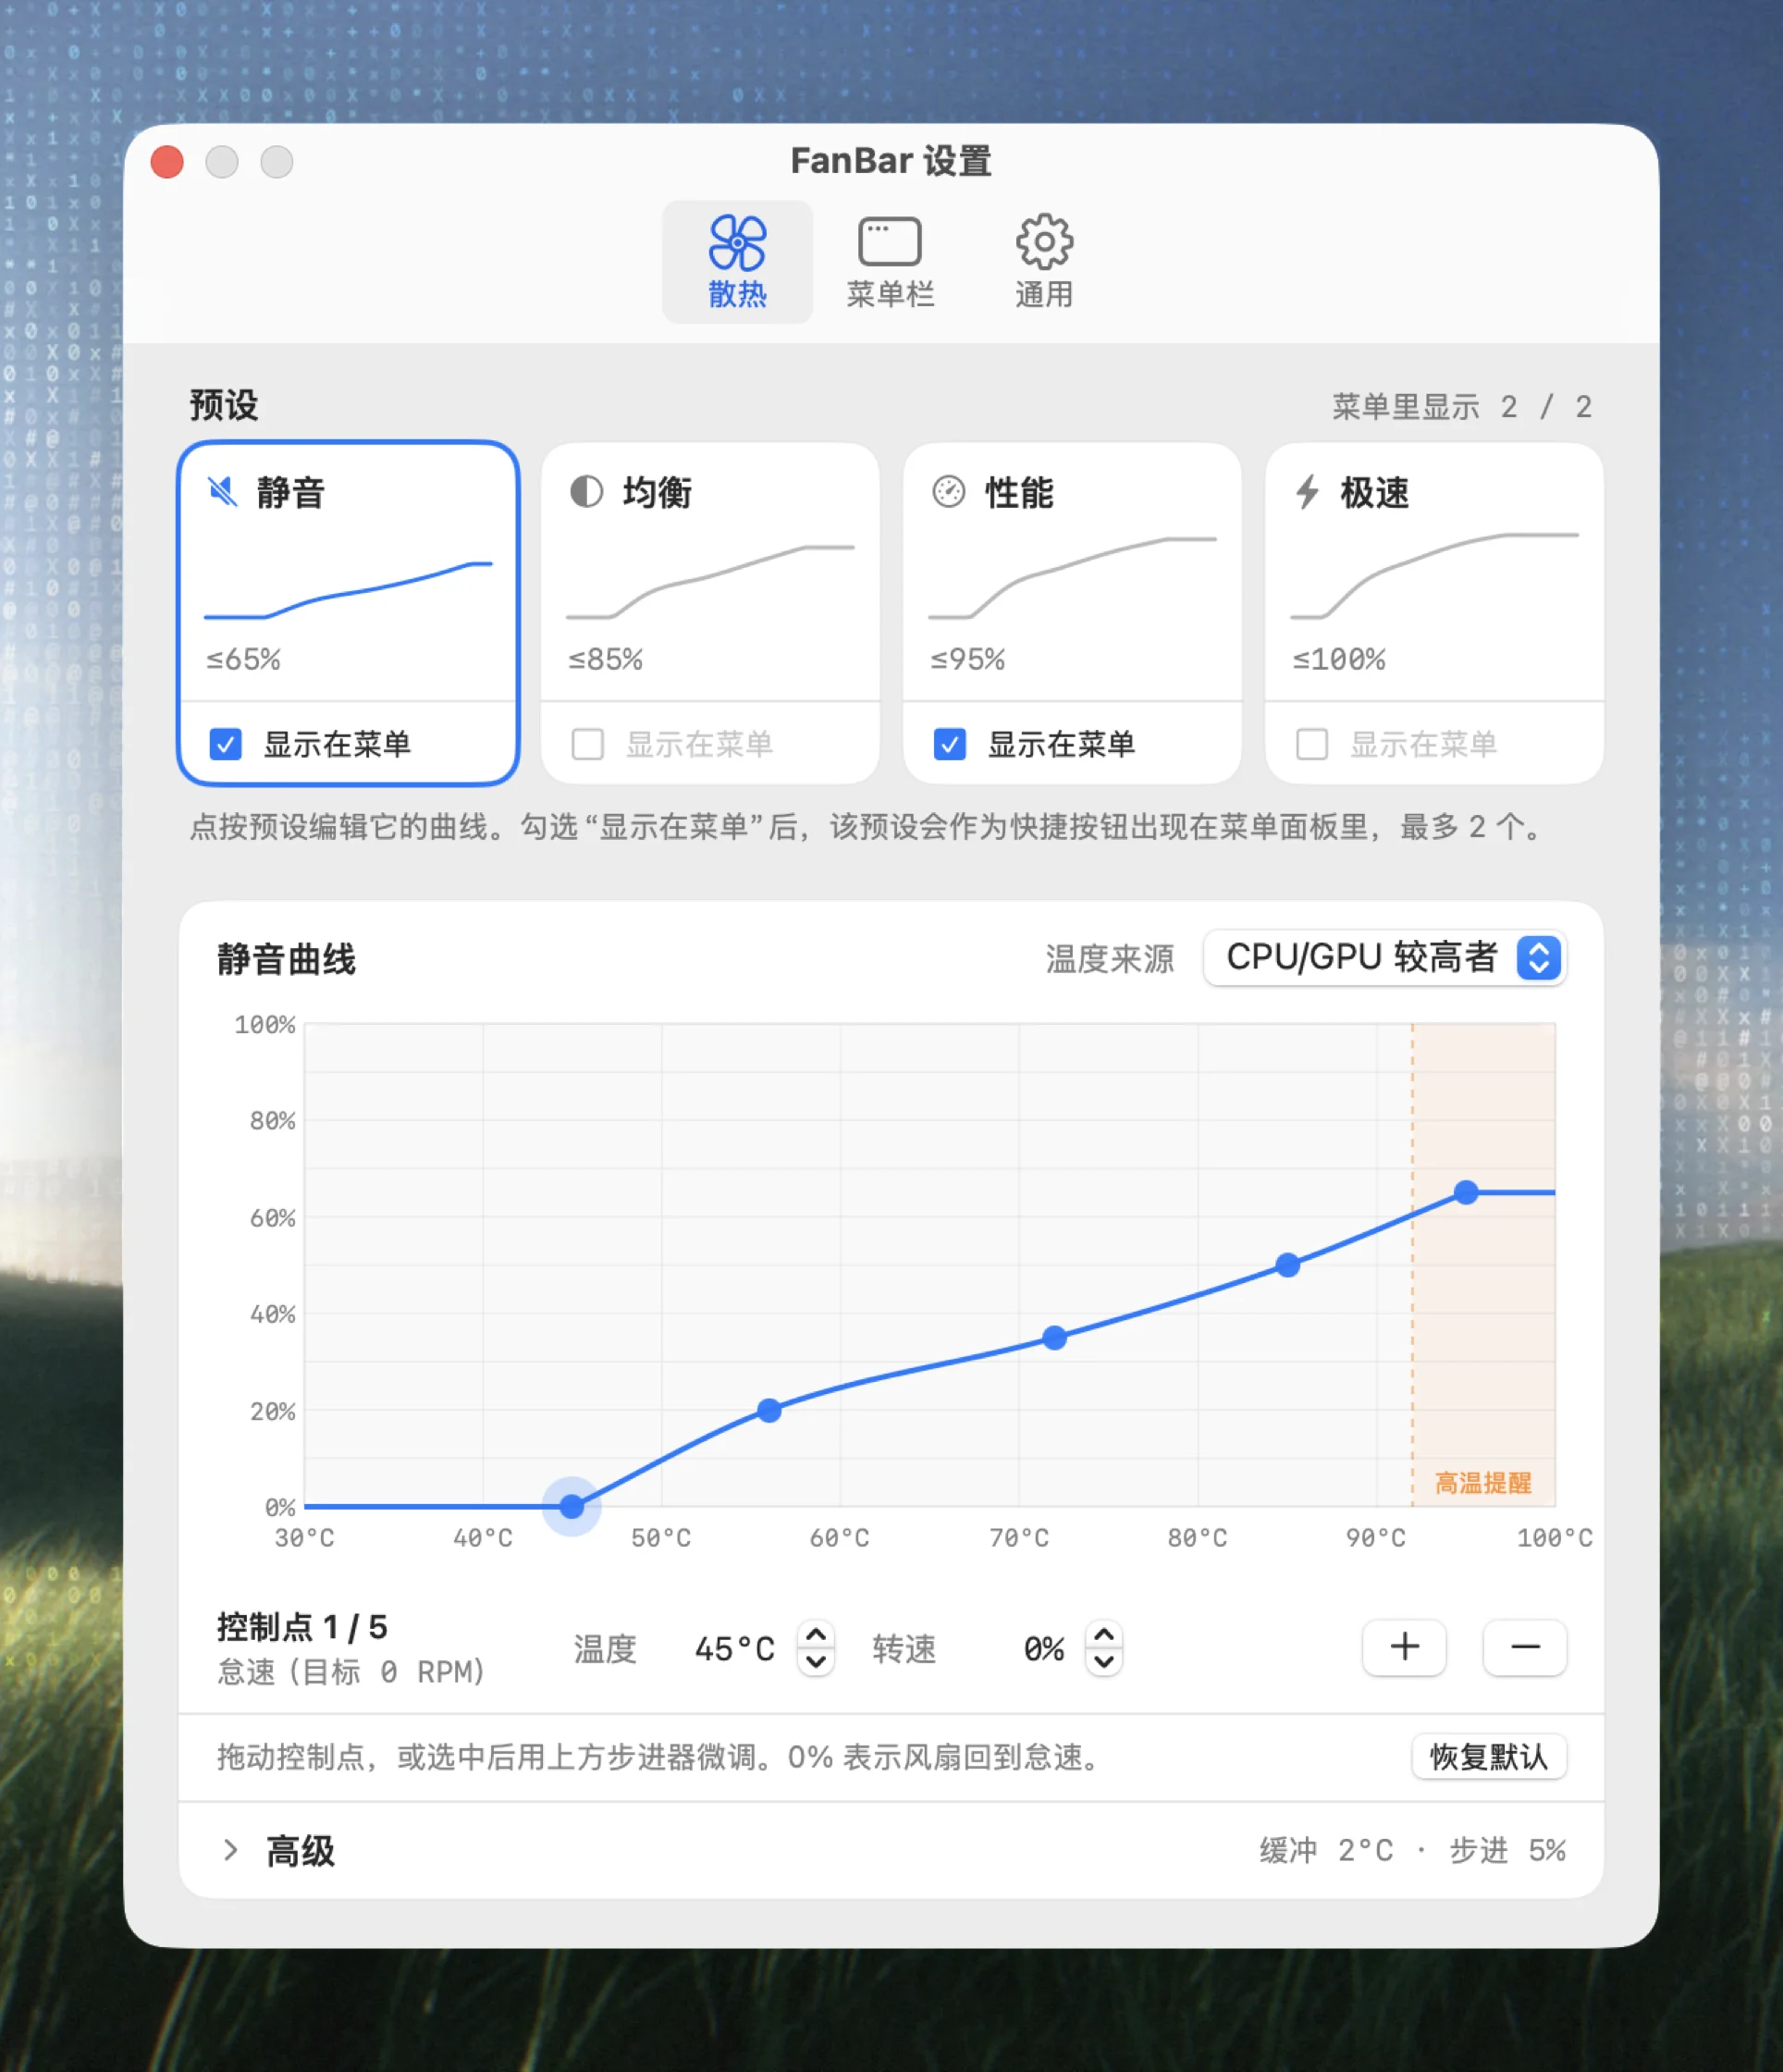
Fan control has four presets, each tied to a real situation rather than an abstract level:
- Coding, compiling, exporting video → Performance or Max: keep temperatures down and accept some noise, then switch back when the heavy work is done
- Late nights, meetings, the library → Silent: minimum speed, but the temperature curve still has your back — if it really heats up, the fans will spin rather than letting the machine cook for the sake of quiet
- Everyday use → Balanced: leave it alone and let it decide
Each preset has its own temperature–speed curve you can draw yourself — say 2,500 RPM below 60°C, 4,500 RPM at 75°C and full speed at 85°C. You drag the curve visually; no SMC keys to memorize.
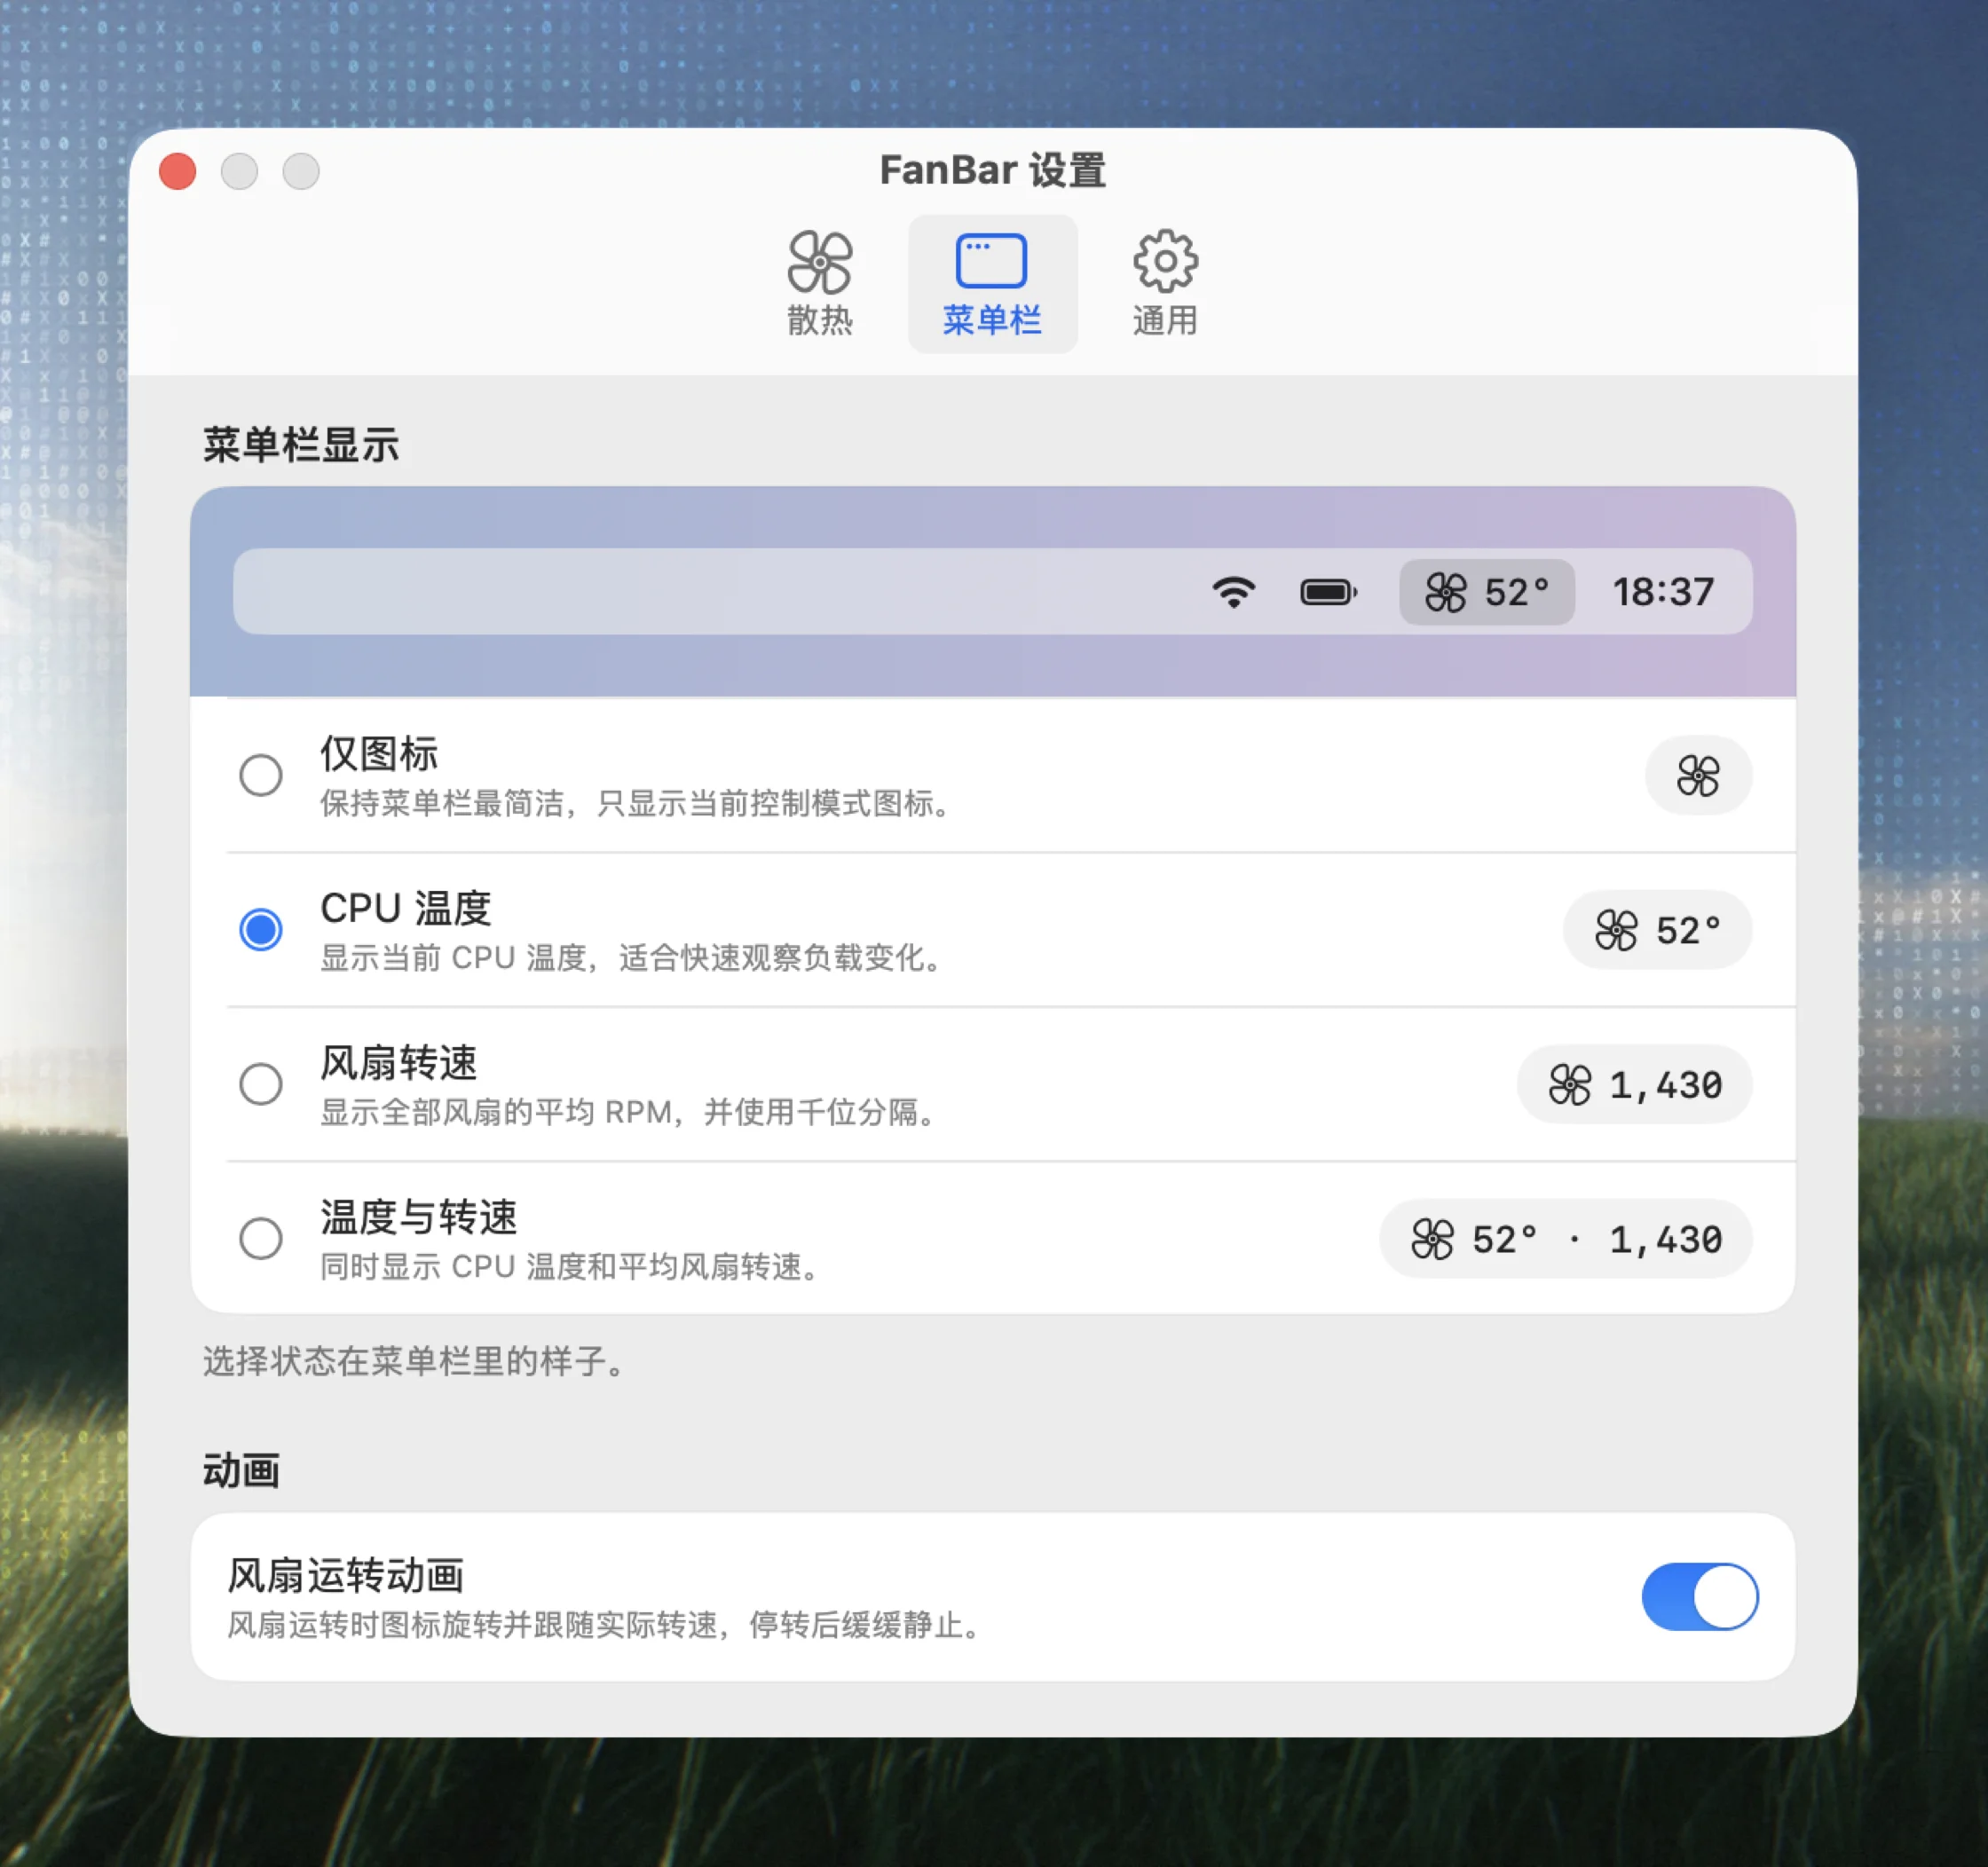
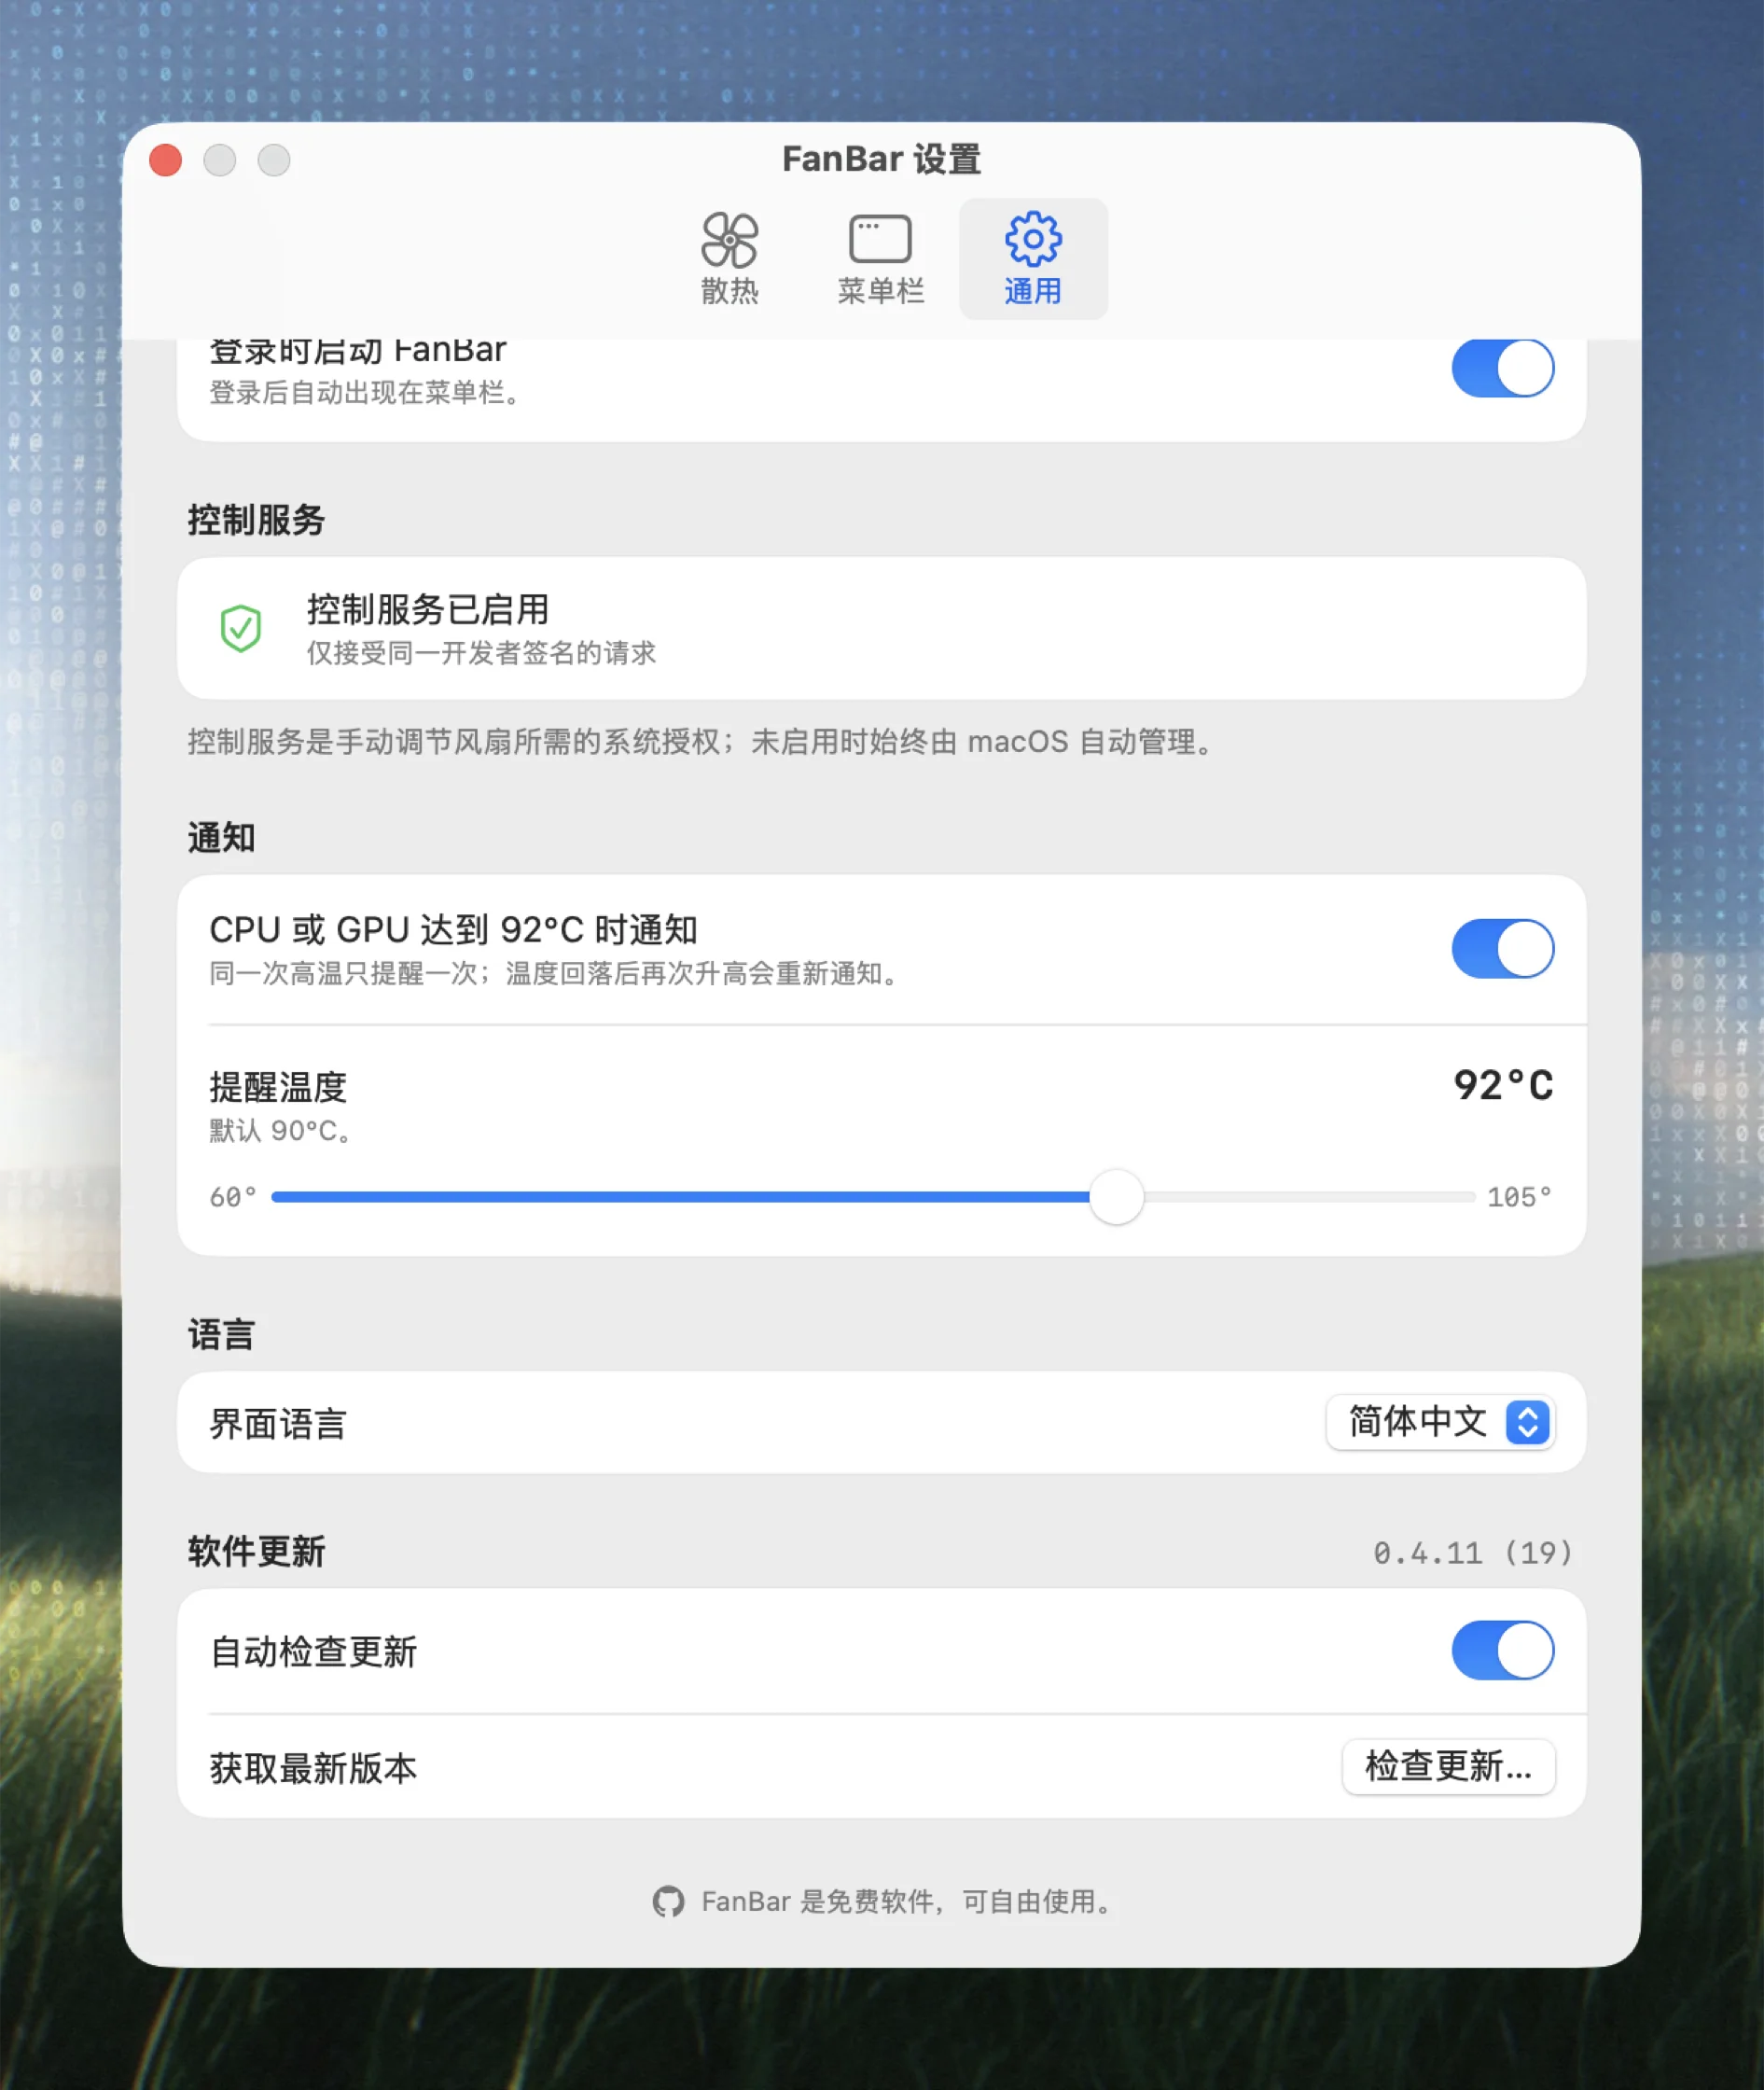
A few small features I use every day: optional notifications above 90°C, a desktop widget on macOS 14 and later so you don’t need the menu bar, and one-click switching between Chinese and English.
4. Three rules I set from the start
Fan control touches hardware directly. Done carelessly, it’s annoying at best and risky at worst. So I fixed three rules from day one.
First, privilege separation: the app never touches hardware itself.
FanBar has two parts. The menu bar app only reads data, draws the UI and stores settings. A separate root helper is what actually reads and writes AppleSMC. They talk over XPC, and the helper only accepts narrow commands like “set fan N to X RPM”. Even if the app has a bug, it can’t reach anything it shouldn’t.
Second, a safety net: the fans never go “out of control”.
The helper only sets speeds within the range the hardware reports, so it never writes absurd values. More importantly, if you quit the app or the helper crashes, control returns to macOS and its default thermal policy. The worst case is “as if it was never installed” — not fans stuck at full blast or stopped. That’s the line I won’t cross.
Third, signed and notarized: download and install, no system tinkering.
Every DMG on GitHub Releases is Developer ID signed and notarized by Apple. You don’t need to disable SIP or bypass Gatekeeper — drag it into Applications and go. A hardware tool that asks you to turn off system protection first isn’t worth trusting.
One implementation pitfall worth mentioning: M-series and Intel SMCs behave differently for fan control — the timing for entering manual mode and the key names both differ, and debugging that was painful. It’s all open source, so if you’re curious about the AppleSMC side, dig in.
5. Requirements and download
macOS 11 or later. All Apple Silicon Macs are supported; Intel Macs need to expose fan data through AppleSMC (most models from 2016 onward do).
FanBar is free and open source:
https://github.com/helson-lin/FanBar
The four preset curves are tuned for my own MacBook, and cooling varies a lot between models. If you have an Intel Mac, a Mac mini or an iMac, please try it and open an issue with how it behaves — I want to keep making the curves more accurate.